

How do I export 300 DPI in Photoshop?
Almost all of my graphic work is for the web. I hadn’t done any print stuff in a long time until just this week, some business size pass-along cards for an addiction recovery program. I exported my images from Adobe Photoshop for upload, the ppi of the PSD file was set at 300 ppi, and I set it the same in the export dialog, but when I looked at the JPG image details, they were only 96 ppi. Fricken’ hell, how is that? I mean, what is wrong with Photoshop that it can’t export an image at 300 ppi?
“Does anyone else have this problem”, I thought? Do any of Photoshops competitors have a problem with this? I had to find out. I don’t own every competitive software, but I do own a few, Affinity Photo (1.10.5 version) and Corel Photo-paint 2019 (buggy version; waiting for the 2022 or better suite to come out).
Photoshop Export Detail
Here’s an example of the Photoshop exported JPG file properties. Note the resolution of 96 dpi and a color depth of 24 bit.

Affinity Photo Export Detail
Now for the Affinity Photo. Affinity does not import Photoshop file well, but it didn’t have any problem keeping the 300ppi and color depth of 32 bit. But the only reason it could do it was because I already have Photoshop installed and Affinity used Photoshop to do it. (Explanation below)

Corel Photo-Paint Export Detail
Photo-Paint in my experience is a master at file handling. Import, export, whatever you want, it’ll do it. No problem exporting from Photo-Paint; 300ppi and color depth of 32 bit.

Photoshop has a Workaround
I did find a solution for Adobe Photoshop users who don’t have other software options. Using the Image Processor will get it done and keep the full resolution and color depth you’ve set.
First, you’ll need to change the image resolution size you want that is about the 96 ppi limit. Just use the shortcut keys ALT + CTRL + I to open the dialog and then set the resolution to the size you want, assuming of course you want something over 96 dpi/ppi.
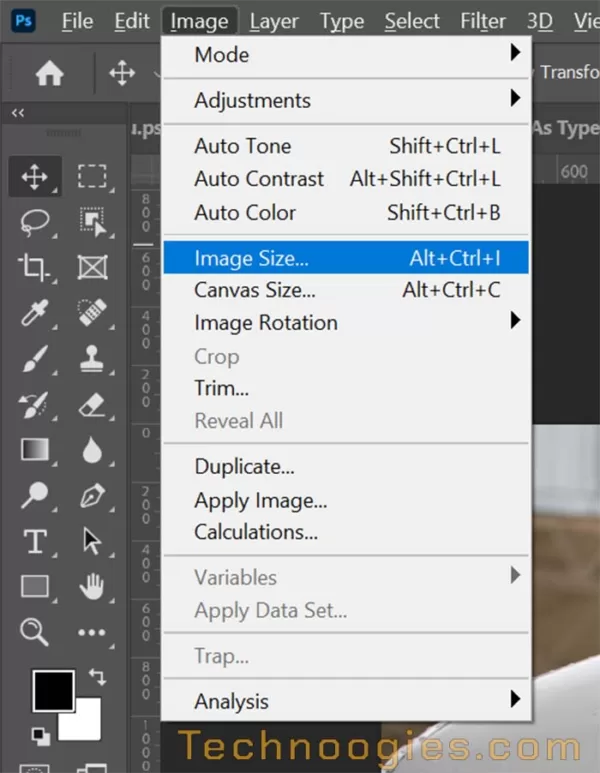
You can also open the Image size dialog from the menu at Image / Image Size.
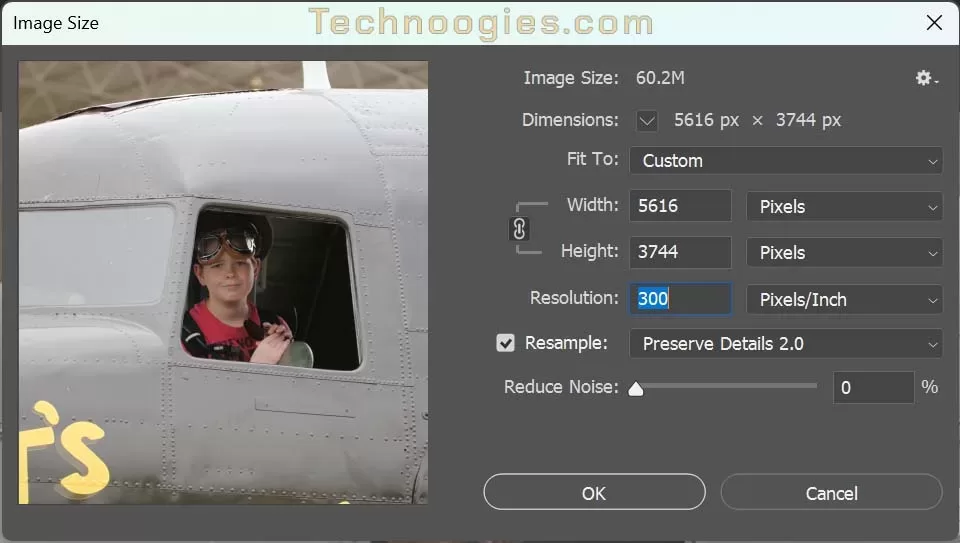
Now you can change your image size to whatever resolution you want before using the image processor script. Just change the Resolution field to your desired resolution. When you have the desired changes click OK.
Resolution Gotchas
Be aware though that the image dimensions will go higher with a higher resolution and so will the file size. Adobe Photoshop does the dimension resizing automatically because the “Resample” is selected by default. If you uncheck “Resample” then the file size will stay the same by reducing dimensions as you increase ppi.
To better understand this, if you have an image that is 4×4 inches and it has a resolution of 72 ppi, the image has a total of 288 pixels (72 ppi x 4 inches = 288 pixels). If you increase the resolution to 300 ppi without changing the dimensions, the image will now contain a total of 1,200 pixels, as in (300 ppi x 4 inches = 1,200 pixels).
Increasing the ppi means that the image contains more pixels in the same physical space when “Resample” is selected. This increase in pixel density can result in a higher quality image with more interpolated detail and sharper edges, but it also means that the file size of the image will increase because there are now more pixels to store.
The resampling default for Photoshop is “Preserve Details 2.0” and works well for up-scaling.
- If you want to export images in Photoshop at anything over 96ppi, use image processor for 300 ppi, located under File > Scripts. You can also export several images at once.

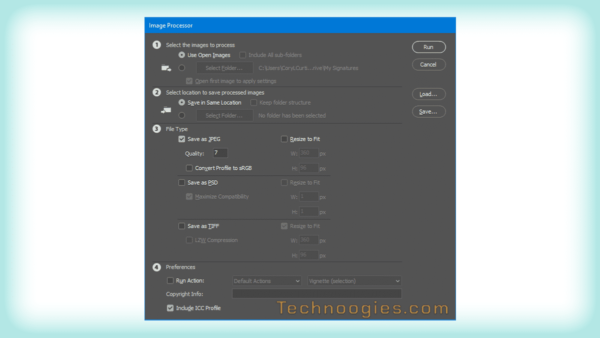
Some settings in the Image Processor dialog need to be considered before running the process.
Image Source Options
If you select ‘Use Open Images’ it will process every image you have open.
If you select the folder option, it will process every image in the folder that Photoshop recognizes the format for and subfolders if you have that checkbox selected as well.
Batch processing is what the Image Processor was designed for.
- Setting 1 is for the image source. Either Images you have open or a Folder.
- Setting 2 is choice of file location
- Setting 3 gives three file types to choose from. Since JPEG is where Photoshop has the issue, I assume that you will select ‘Save as JPEG’ like I did.
- Setting 4 wasn’t relevant to my circumstances but may be to you, I ignored it and left the default setting.
- Now click on “Run” at the top right corner of the dialog.
If you want to save the settings to reuse later then click “Save.”
(Special thanks to the user that pointed out this missing step.)

Another Gotcha
Make sure that ‘Resize to Fit’ is NOT selected to have an export that has the same specs and dimensions as your work file, or you may get some undesirable results. Ask me how I know.
If you used ‘Save in Same Location’ on option 2 then the files will be placed in a subfolder named JPEG, PNG, SVG, and so on.
So how did Affinity Photo do it? It used the Adobe Image Processor . . . It cheated. The clue is in the ‘Program Name’ in the image detail screenshots.
My Source
Solved: Re: How to export a JPEG with 300dpi? PS keeps exp… – Adobe Support Community – 8146131
Related Noogies


- About the Author
- Latest Posts

Professional geek and early implementer of virtualization in 1998.
Small business owner and was once the network admin for Knight Transportation. Racquetball fanatic, but had to retire from it.
Business, Technical, and Administrative Professional of Web Design, SEO, SSO, UX/UI, Networked Systems, and Virtualization with more than 20 years of experience.