

Sometimes I create these posts because even though the info is already out there on the Internet . . . somewhere, it often lacks clarity, is outdated, is missing steps, or has incorrect information. This is why this article exists here on Technoogies and I just wanted it in a clear and concise way, mostly for myself, so I could easily reference it each time I needed it. CertBot has many plugins to fit just about every environment, but we’re only going to use the Cloudflare plugin for this tutorial. Honestly, if you’re not using Cloudflare, then why not?
Sections of this article are copied directly from the various documents. Really now, how am I going to say it any better? I’m just bringing it all together in one place, hopefully with additional clarity. Without AI spin. We don’t do AI articles here.
I apologize for the length of this monster, but clarity matters.
Let’s Encrypt – Technoogies Gets New User of the Month Award
I guess I asked too many questions and got the coveted “New User of the Month” award. That seems backwards somehow.
CertBot Info
Documentation for the stable release of CertBot can be found here:
https://eff-certbot.readthedocs.io/en/stable/using.html
Standalone and Webroot are installed by default, but there are lot of plugins that will probably fit with your environment. We’re only going to use the Cloudflare plugin for this tutorial though.
CertBot helps you achieve two tasks: ( From the Docs )
- Obtaining a certificate: automatically performing the required authentication steps to prove that you control the domain(s), saving the certificate to /etc/letsencrypt/live/ and renewing it on a regular schedule.
- Optionally, installing that certificate to supported web servers (like Apache or nginx) and other kinds of servers. This is done by automatically modifying the configuration of your server in order to use the certificate.
The CertBot Commands:
https://eff-certbot.readthedocs.io/en/stable/using.html#certbot-command-line-options
CertBot Plugins
The CertBot Snap stuff page: (This is the method you want)
CertBot Project (certbot-eff) published snaps in the Snap Store (snapcraft.io)

The list at post time: (Linked to each plugin doc)
- certbot-dns-cloudflare
- certbot-dns-digitalocean
- certbot-dns-dnsimple
- certbot-dns-dnsmadeeasy
- certbot-dns-gehirn
- certbot-dns-google
- certbot-dns-linode
- certbot-dns-luadns
- certbot-dns-nsone
- certbot-dns-ovh
- certbot-dns-rfc2136
- certbot-dns-route53
- certbot-dns-sakuracloud
Plugins for CertBot on Docker
(CertBot can’t install certificates automatically with this method . . . At post time. Eventually . . . Maybe.)
Installing CertBot and Plugin Packages with Snap
Snap is the CertBot recommended method to install CertBot, although some servers can’t use Snap. I’m only going to cover the Snap method for CertBot here because it is the only one I have researched.
In this tutorial we will run everything from the root home folder, so the first step is to log into the shell, be it bash or whatever you use. CertBot has details about each platform and its supported shell environments in its docs . . . Somewhere, I saw it once.
Wisdom of apt update
Why should I run apt update before every package installation? To re-synchronize the package index files from their sources. It is a precautionary wisdom. Oh be wise, what can I say more.
Log into your shell with SSH as root.
- Yep, login as root.
- Make sure you are in the root home using pwd on the command line.
It should show you /root as your location in the file system. If not, then use cd /root and check again with pwd. It’s just a common practice to work from this location, so we will. - Type or paste sudo apt update and run it by pressing enter (All command line executions are done by pressing enter.) Some say to run apt update prior to each package install and some say it isn’t necessary. It doesn’t hurt to run it prior to each install though in case you want to be certain your package index is spit-spot (Per Mary Poppins).
Install Snap Daemon (snapd), but first, we remove the outdated one.
Snap is pre-installed on Ubuntu by default, but if you want to check, you can do this at the prompt with certbot –version or snap –help to display the help dialog for Snap. If you see the version number or help dialog on the prompt, you have Snap.
certbot --version
CertBot remove and re-install (Per CertBot)
I’m just gonna’ put it here exactly as they wrote it on their page, https://certbot.eff.org/instructions?ws=other&os=ubuntufocal
This is from the webserver type “Other” selection, but you can select any of the installation options on their page, but they all give the same set of instructions for this operation.
Remove certbot-auto and any CertBot OS packages (From Docs)
If you have any CertBot packages installed using an OS package manager like apt, dnf, or yum, you should remove them before installing the CertBot snap to ensure that when you run the command certBot the snap is used rather than the installation from your OS package manager. The exact command to do this depends on your OS, but common examples are sudo apt-get remove certbot, sudo dnf remove certbot, or sudo yum remove certbot.
apt vs apt-get ( The short version )
apt-get – No automatic install of package dependencies. Granular control.
apt – Package dependencies are also installed. User friendly. Progress bar (That’s cool).
(Now wasn’t that easy? And you didn’t need to read a 1,000-word blog post about it.)
sudo apt -y remove certbot
sudo apt autoremove
Install CertBot with Snap
Install Snap Command
Run this command on the command prompt of the system you want to install CertBot on, which will install the latest version and not the Ubuntu package, version 0.40.0 at the time of this post, and will not work with the Cloudflare Token option. This is also why you need to run the remove command above prior to the Certbot Snap installation.
sudo apt update
sudo snap install --classic certbot
Checking Snap to see if it is loaded and running
Either log out and back in again, or restart your system, to ensure CertBot’s paths are updated correctly, or you’ll get this message below and waste a lot of time trying to figure it out. Ask me how I know. No, don’t.
root@esp1:~# certbot plugins
-bash: /usr/bin/certbot: No such file or directory
You rebooted or logged out and back into your server, right?
All right then, if you want to test to make sure it is loaded and working you can install and run the “hello-world” snap or just run certbot –version.
Hello World Example:
# sudo snap install hello-world
hello-world 6.4 from Canonical✓ installed
# hello-world
Hello World!
Install the CertBot Cloudflare plugin in a Snap ( PUN )
What? You didn’t see that coming?
NOTE: Cloudflare Token Caviat
Installing this CertBot Cloudflare Snap package is the only method I have used so far where I’ve been able to get the Cloudflare Token to work. Knock yourself out trying the Python installs if you wish. Snap is CertBot’s install method of choice.
Support for certbot-dns-cloudflare was added in the 1.2.0 version, so you have to make sure you get that version or greater.
Go to this site if you need a different DNS plugin. Click the ‘latest/stable‘ button for installation info, or the ‘Install‘ button, but the former gives you granular selection of your options.
Install certbot-dns-cloudflare on Ubuntu using the Snap Store | Snapcraft

These commands will both install and insure the proper settings for your CertBot Cloudfalre DNS plugin.
Run each line one at a time.
sudo apt update
snap set certbot trust-plugin-with-root=ok
sudo ln -s /snap/bin/certbot /usr/bin/certbot
snap install certbot-dns-cloudflare
snap connect certbot:plugin certbot-dns-cloudflare
Check the installed plugins
Now run certbot plugins to verify that the certbot-dns-cloudflare plugin is installed correctly. This is what it should look like, depending on the plugins you have installed, but you should see the Cloudflare plugin in this list.
# certbot plugins
Saving debug log to /var/log/letsencrypt/letsencrypt.log
- - - - - - - - - - - - - - - - - - - - - - - - - - - - - - - - - - - - - - - -
* apache
Description: Apache Web Server plugin
Interfaces: Authenticator, Installer, Plugin
Entry point: EntryPoint(name='apache',
value='certbot_apache._internal.entrypoint:ENTRYPOINT', group='certbot.plugins')
* dns-cloudflare
Description: Obtain certificates using a DNS TXT record (if you are using
Cloudflare for DNS).
Interfaces: Authenticator, Plugin
Entry point: EntryPoint(name='dns-cloudflare',
value='certbot_dns_cloudflare._internal.dns_cloudflare:Authenticator',
group='certbot.plugins')
* nginx
Description: Nginx Web Server plugin
Interfaces: Authenticator, Installer, Plugin
Entry point: EntryPoint(name='nginx',
value='certbot_nginx._internal.configurator:NginxConfigurator',
group='certbot.plugins')
* standalone
Description: Runs an HTTP server locally which serves the necessary validation
files under the /.well-known/acme-challenge/ request path. Suitable if there is
no HTTP server already running. HTTP challenge only (wildcards not supported).
Interfaces: Authenticator, Plugin
Entry point: EntryPoint(name='standalone',
value='certbot._internal.plugins.standalone:Authenticator',
group='certbot.plugins')
* webroot
Description: Saves the necessary validation files to a
.well-known/acme-challenge/ directory within the nominated webroot path. A
seperate HTTP server must be running and serving files from the webroot path.
HTTP challenge only (wildcards not supported).
Interfaces: Authenticator, Plugin
Entry point: EntryPoint(name='webroot',
value='certbot._internal.plugins.webroot:Authenticator',
group='certbot.plugins')
- - - - - - - - - - - - - - - - - - - - - - - - - - - - - - - - - - - - - - - -
Create a Cloudflare API token for DNS only
- Login to your Cloudflare account and navigate to any domain. It doesn’t matter which one, it is just that the menu item on the bottom right is not on the main dashboard anywhere. You should have the ‘Overview’ section selected from the left menu.
-
GET YOUR API TOKEN
Scroll down towards the bottom of the page.
On the left side click on ‘Get your API token’.
https://dash.cloudflare.com/profile/api-tokens

-
CREATE TOKEN
Click on the ‘Create Token’ button, top right. Select the top template, ‘Edit zone DNS’ by clicking the adjacent button to the right of it.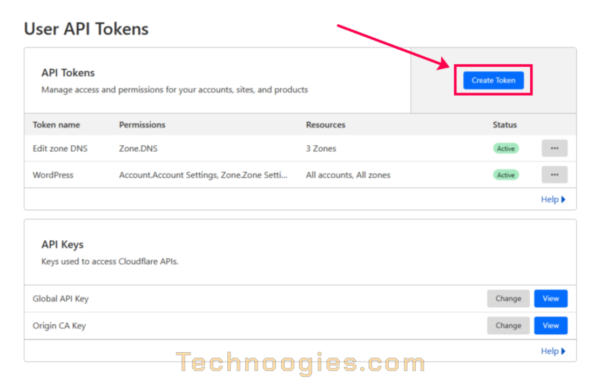
-
PERMISSIONS
The ‘Permissions’ section is already set properly via the template.
ZONE RESOURCES
Go down to the ‘Zone Resources’ section and it should be set to ‘Include’ in the first field which is a template default also.
SPECIFIED ZONE
The second field set to ‘Specified zone’, and in the third field select the domain name you want SSL certificates for. Repeat this for as many DNS zone you need certificates for by clicking the ‘+Add more’ link.
CLIENT IP ADDRESS FILTERING
If you select nothing and leave it as ‘Select item…’ then you can proceed to create the token without IP filtering, but I wouldn’t do that if I were you. The extra security is indispensable. If in the event someone acquires the token, they wouldn’t be able to use it unless they had access to one of the system IP’s in the filter.
‘Is in’ is typically what we want for this token. The other option ‘Is not in’ will exclude access to any IP addresses placed in the field to the right. Type in the IP addresses from which these certificate requests will be coming from. As you type out the address, there will be a clickable balloon with the address in it below the field. You must click on this to add the address into the field. You can add as many addresses as you need here. It will only accept single addresses at a time. (Bummer)
- All done?
Click on ‘Continue to summary’.
Does everything look right?
Click on ‘Create Token’.
- COPY TOKEN
Now you can copy the token and guard it with your life.
I also recommend running the curl script from your prompt to test the token to insure it is valid.
Your result should look like this.
{“result”:{“id”:”1234567890abcdefghijklmnopqrstuvwxyz”,”status”:”active”},”success”:true,”errors”:[],”messages”:[{“code”:10000,”message”:”This API Token is valid and active”,”type”:null}]}
Configuring Your Cloudflare Plugin
Create a secure folder for cloudflare.ini
Next you will create a secure location for the cloudflare.ini file in the root directory (if you’re old school) or folder. The path will be /root/.secrets/cloudflare.ini. If you are logged in as root, the touch command without sudo should set the file permissions already for root only, being 0700. Using sudo touch sets permissions to 0644. We should make it more secure and change that with chmod to 0400. We also need to change the permissions on .secret to 0700. Most situations will work with the file permission set to 0400, but if not, try 0600 instead.
Run each command one at a time.
mkdir /root/.secrets
touch /root/.secrets/cloudflare.ini
sudo chmod 0700 /root/.secrets/
sudo chmod 0400 /root/.secrets/cloudflare.ini
Use nano or vim, or whatever text editor you prefer and add your token to the cloudflare.ini file.
Edit cloudflare.ini
nano /root/.secrets/cloudflare.ini
# Cloudflare Token
dns_cloudflare_api_token = "1234567890abcdefghijklmnopqrstuvwxyz"
CertBot cli.ini configuration
The CertBot cli.ini file is located in /etc/letsencrypt/cli.ini unless you haven’t made any requests yet. If that is the case, then use the ‘touch‘ command.
touch /etc/letsencrypt/cli.ini
nano /etc/letsencrypt/cli.ini
We’re going to edit this to use the Cloudflare plugin by default.
Add the path for the cloudflare.ini file we just edited.
dns-cloudflare-credentials = /root/.secrets/cloudflare.ini
You can also add Cloudflare as the authenticator if this is how you’re going to get your certs, but if you need to use a different authenticator, you’ll need to comment this out or change it to the one you want to use, i.e. Nginx, Webroot, or Apache, etc.
More cli.ini options
authenticator = dns-cloudflare
OR
If you are not going to use the CertBot Cloudflare plugin. Just insert your plugin of choice after the equal sign.
authenticator = webroot
In my cli.ini I use these lines to run CertBot. By placing these in the cli.ini, I do not need to include this information in my CertBot command string.
dns-cloudflare-credentials = /root/.secrets/cloudflare.ini
authenticator = dns-cloudflare
dns-cloudflare-propagation-seconds = 120 ## 60 fails sometimes.
preferred-challenges = dns-01
I have found that the default dwell time of 10 seconds is insufficient for the propagation of the TXT record to be verified by Let’s Encrypt, so I set it here to 120 seconds. I also tried 60, but that also fails often. You can also use –dn-cloudflare-propagation 120 in your CertBot command string, no equal sign in it.
Time for a dry-run test
In these CertBot examples we are only acquiring a certificate but not installing them by using the certonly option. If you want the certificate installed, use certbot without certonly and the plugin for your environment. Plugin operations can be combined. See the Docs for how to do this. The Cloudflare plugin does not install certificates either. You will still need to manually manage them after acquiring them.
NOTE: ( From the Docs )
–dry-run
Perform a test run against the Let’s Encrypt staging server, obtaining test (invalid) certificates but not saving them to disk. This can only be used with the ‘certonly‘ and ‘renew‘ subcommands. It may trigger webserver reloads to temporarily modify & roll back configuration files.
–pre-hook and –post-hook commands run by default. –deploy-hook commands do not run, unless enabled by –run-deploy-hooks.
The test server may be overridden with –server. (default: False
Without having the directives in your cli.ini your CertBot command string will need to be like this.
certbot certonly --dry-run --dns-cloudflare --dns-cloudflare-propagation-seconds 120 --dns-cloudflare-credentials /root/.secrets/cloudflare.ini -d example.com,*.example.com --preferred-challenges dns-01
But if you have the directives present in cli.ini then this is all you need.
certbot certonly --dry-run -d example.com,*.example.com
Your results should look like this if successful.
root@esp1:~# certbot certonly --dry-run -d example.com,*.example.com
Saving debug log to /var/log/letsencrypt/letsencrypt.log
Simulating a certificate request for example.com and 3 more domains
Waiting 120 seconds for DNS changes to propagate
The dry run was successful.
You can also test the renewal request with the ‘renew‘ command.
certbot renew --dry-run -d example.com,*.example.com
Time for the real deal!
Just remove the –dry-run from your command like so.
certbot certonly -d example.com,*.example.com
Notice – Multiple domain requests
I have found that stringing multiple domain requests together with -d, like -d example.com,*.example.com -d example.app,*example.app will not create separate certificates, but adds all domains to the same certificate. It is the same as putting a comma and separating domains as list like so, -d example.com,*.example.com,example.app,*example.app.
Takeaway: If you want separate certs for each domain, run them separate from each other by running each one in a single certificate request.
The Results
So now you have certificates and automatic renewal is going to keep them up to date for you . . . I hope.
The results dialog should resemble this.
root@esp1:~# certbot certonly -d example.com,*.example.com -d example.com,*.example.com
Saving debug log to /var/log/letsencrypt/letsencrypt.log
Requesting a certificate for example.com and 3 more domains
Waiting 120 seconds for DNS changes to propagate
Successfully received certificate.
Certificate is saved at: /etc/letsencrypt/live/example.com/fullchain.pem
Key is saved at:         /etc/letsencrypt/live/example.com/privkey.pem
This certificate expires on 2024-03-28.
These files will be updated when the certificate renews.
Certbot has set up a scheduled task to automatically renew this certificate in the background.
Now check the certs
Use certbot certificates at the command prompt.
# sudo certbot certificates
- - - - - - - - - - - - - - - - - - - - - - - - - - - - - - - - - - - - - - - -
Found the following certs:
  Certificate Name: example.com
    Serial Number: 459d220f63a0c2377c76aa47b7218e564cb
    Key Type: ECDSA
    Domains: example.com *.example.com
    Expiry Date: 2024-03-28 01:20:56+00:00 (VALID: 89 days)
    Certificate Path: /etc/letsencrypt/live/example.com/fullchain.pem
    Private Key Path: /etc/letsencrypt/live/example.com/privkey.pem
- - - - - - - - - - - - - - - - - - - - - - - - - - - - - - - - - - - - - - - -
Let’s check renewal capability
We do this with certbot renew –dry-run and the results should say thus.
# sudo certbot renew --dry-run
- - - - - - - - - - - - - - - - - - - - - - - - - - - - - - - - - - - - - - - -
Processing /etc/letsencrypt/renewal/example.com.conf
- - - - - - - - - - - - - - - - - - - - - - - - - - - - - - - - - - - - - - - -
Simulating renewal of an existing certificate for example.com and 3 more domains
Waiting 120 seconds for DNS changes to propagate
- - - - - - - - - - - - - - - - - - - - - - - - - - - - - - - - - - - - - - - -
Congratulations, all simulated renewals succeeded:
  /etc/letsencrypt/live/example.com/fullchain.pem (success)
- - - - - - - - - - - - - - - - - - - - - - - - - - - - - - - - - - - - - - - -
Now what?
There are other ways to install CertBot and the Cloudflare DNS plugin, like pip, but the Snap packages are the easiest and best maintained at this time. Also, the easiest to update.
If you have errors, they will be logged in /var/log/letsencrypt/letsencrypt.log by default. If I recall, the default saves up to 1000 lines or kb, but either way, you will find the details of the issue there. I’m not going to include how to debug the stuff, maybe another time when I know how, LOL.
Related Noogies


- About the Author
- Latest Posts

Professional geek and early implementer of virtualization in 1998.
Small business owner and was once the network admin for Knight Transportation. Racquetball fanatic, but had to retire from it.
Business, Technical, and Administrative Professional of Web Design, SEO, SSO, UX/UI, Networked Systems, and Virtualization with more than 20 years of experience.