

How do I export 300 DPI in Photoshop?
Fast alle meine grafischen Arbeiten sind für das Web. Ich hatte lange Zeit nichts mehr gedruckt, bis gerade diese Woche, ein paar Pass-Along-Karten in Geschäftsgröße für ein Programm zur Genesung von Suchtkranken. Ich habe meine Bilder von Adobe exportiert Photoshop for upload, the ppi of the PSD file was set at 300 ppi, and I set it the same in the export dialog, but when I looked at the JPG image details, they were only 96 ppi. Fricken’ hell, how is that? I mean, what is wrong with Photoshopdass es kein Bild mit 300 ppi exportieren kann?
„Hat noch jemand dieses Problem“, dachte ich? Hat einer der Photoshop-Konkurrenten ein Problem damit? Ich musste es herausfinden. Ich besitze nicht jede Konkurrenzsoftware, aber ich besitze ein paar, Affinity Photo (Version 1.10.5) und Corel Photo-Paint 2019 (fehlerhafte Version; warte auf die Veröffentlichung der Suite 2022 oder besser).
PhotoshopExportdetail
Hier ist ein Beispiel für die PhotoshopEigenschaften der exportierten JPG-Datei. Beachten Sie die Auflösung von 96 dpi und eine Farbtiefe von 24 Bit.

Affinity Photo Export-Details
Nun zum Affinity Photo. Affinität wird nicht importiert PhotoshopDatei gut, aber es gab keine Probleme, die 300 ppi und die Farbtiefe von 32 Bit beizubehalten. Aber der einzige Grund, warum es das tun konnte, war, weil ich es bereits getan habe Photoshopinstalliert und Affinity verwendet Photoshopes zu tun. (Erklärung unten)

Corel Photo-Paint-Exportdetails
Photo-Paint ist meiner Erfahrung nach ein Meister im Umgang mit Dateien. Importieren, exportieren, was immer Sie wollen, es wird es tun. Kein Problem beim Exportieren aus Photo-Paint; 300 ppi und Farbtiefe von 32 Bit.

Photoshophat eine Problemumgehung
Ich habe eine Lösung für Adobe gefunden Photoshop users who don’t have other software options. Using the Image Processor will get it done and keep the full resolution and color depth you’ve set.
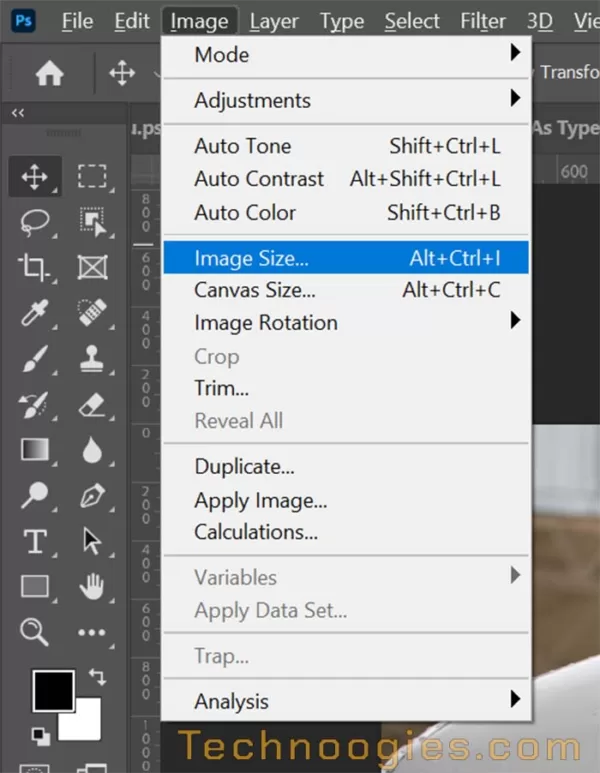
First, you’ll need to change the image resolution size you want that is about the 96 ppi limit. Just use the shortcut keys ALT + STRG + I to open the dialog and then set the resolution to the size you want, assuming of course you want something over 96 dpi/ppi.
Sie können den Dialog Bildgröße auch über das Menü unter öffnenBild / Bildgröße.
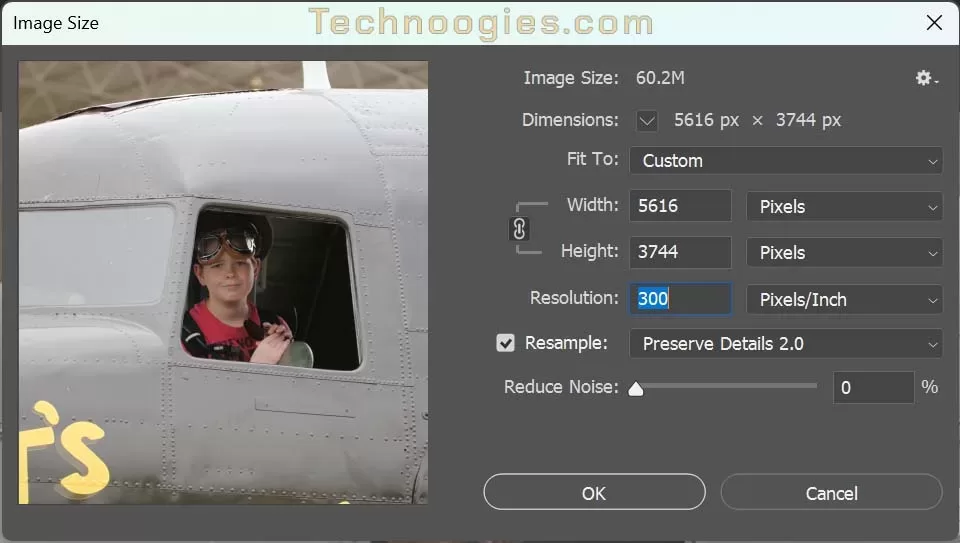
Now you can change your image size to whatever resolution you want before using the image processor script. Just change the Resolution field to your desired resolution. When you have the desired changes click Ok.
Auflösung Fallstricke
Be aware though that the image dimensions will go higher with a higher resolution and so will the file size. Adobe Photoshop does the dimension resizing automatically because the “Resampling“ ist standardmäßig ausgewählt. Wenn Sie das Häkchen bei „Resampling” then the file size will stay the same by reducing dimensions as you increase ppi.
To better understand this, if you have an image that is 4×4 inches and it has a resolution of 72 ppi, the image has a total of 288 pixels (72 ppi x 4 inches = 288 pixels). If you increase the resolution to 300 ppi without changing the dimensions, the image will now contain a total of 1,200 pixels, as in (300 ppi x 4 inches = 1,200 pixels).
Increasing the ppi means that the image contains more pixels in the same physical space when “Resample” is selected. This increase in pixel density can result in a higher quality image with more interpolated detail and sharper edges, but it also means that the file size of the image will increase because there are now more pixels to store.
The resampling default for Photoshop is “Preserve Details 2.0” and works well for up-scaling.
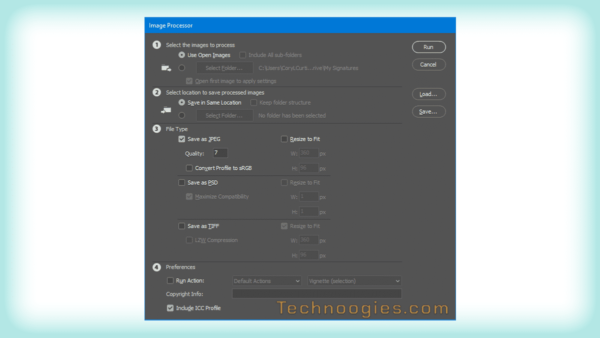
- Wenn Sie Bilder in exportieren möchten PhotoshopVerwenden Sie bei allem über 96 ppi den Bildprozessor für 300 ppi, der sich unter befindetDatei > Skripte. Sie können auch mehrere Bilder auf einmal exportieren.

Some settings in the Image Processor dialog need to be considered before running the process.
Bildquellenoptionen
Wenn Sie „Geöffnete Bilder verwenden“ auswählen, werden alle geöffneten Bilder verarbeitet.
Wenn Sie die Ordneroption auswählen, wird jedes Bild in diesem Ordner verarbeitet Photoshoperkennt das Format für und Unterordner, wenn Sie dieses Kontrollkästchen ebenfalls aktiviert haben.
Stapelverarbeitung ist das, wofür der Bildprozessor entwickelt wurde.
- Einstellung 1 ist für die Bildquelle. Entweder Bilder, die Sie geöffnet haben, oder ein Ordner.
- Einstellung 2 ist die Wahl des Dateispeicherorts
- Einstellung 3 bietet drei Dateitypen zur Auswahl. Da ist JPEG wo Photoshop has the issue, I assume that you will select ‘Save as JPEG’ like I did.
- Einstellung 4 war für meine Umstände nicht relevant, aber vielleicht für Sie, ich habe sie ignoriert und die Standardeinstellung belassen.
- Now click on “Run” at the top right corner of the dialog.
If you want to save the settings to reuse later then click “Save.”
(Besonderer Dank geht an den Benutzer, der auf diesen fehlenden Schritt hingewiesen hat.)

Noch ein Gotcha
Stelle sicher das'Größe anpassen'NICHT ausgewählt ist, um einen Export zu haben, der die gleichen Spezifikationen und Abmessungen wie Ihre Arbeitsdatei hat, oder Sie erhalten möglicherweise einige unerwünschte Ergebnisse. Frag mich, woher ich das weiß.
Wenn Sie bei Option 2 „Am selben Ort speichern“ verwendet haben, werden die Dateien in einem Unterordner namens JPEG, PNG, SVG usw. abgelegt.
So how did Affinity Photo do it? It used the Adobe Image Processor . . . It cheated. The clue is in the ‘Program Name’ in the image detail screenshots.
Meine Quelle
Verwandte Noogies


- Über den Autor
- Neueste Beiträge

Professioneller Geek und früher Implementierer der Virtualisierung im Jahr 1998.
Inhaber eines Kleinunternehmens und war einst Netzwerkadministrator für Knight Transportation. Racquetball-Fan, musste sich aber davon zurückziehen.
Business, Technical, and Administrative Professional of Web Design, SEO, SSO, UX/UI, Networked Systems, and Virtualization with more than 20 years of experience.